
This Article From Issue
May-June 2017
Volume 105, Number 3
Page 132
To the Editors:
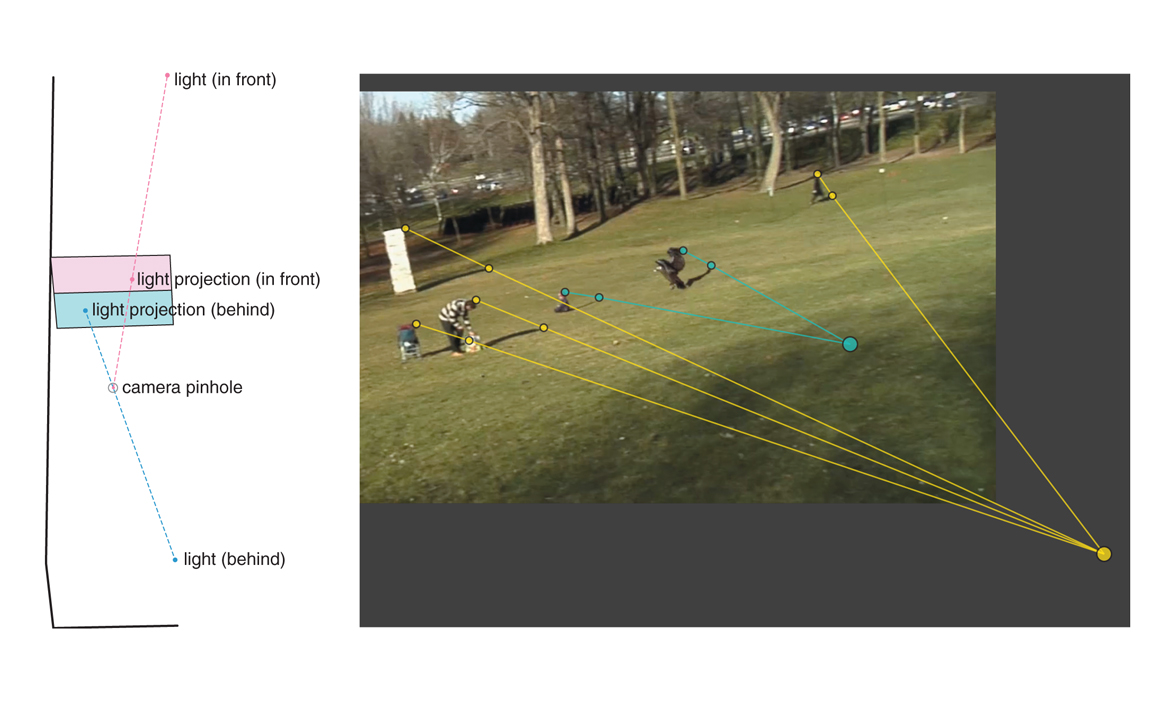
I read with interest the article “How to Detect Faked Photos,” by Hany Farid (Computing Science, March–April). But the figure on page 81 (shown below), demonstrating that the video of an eagle snatching a child was faked, bothers me. The lines from points on the solid objects to their corresponding shadows converge at a point to the right and below the ground (the “fake” object projection lines also converge on or under the ground). But the point had been made earlier that these lines must converge at the light source. Surely the Sun is not shining through the Earth from the shadows to the objects.
Judging by the shadows, it seems that the Sun is moderately high and to the left, although the leftmost tree casts a shadow at an anomalous angle. How can the lines converge as they do?
Michael Levine
Evanston, IL
Dr. Farid responds:
In the shadow analysis of “Golden Eagle Snatches Kid,” several readers were puzzled by the fact that the projection of the light source was in the lower-right corner. Mr. Levine is right to be puzzled by the location of the light source. (This scenario puzzled me as well when we first developed this forensic analysis.) Because the light is above the ground, the reasoning goes, why isn’t the projection of the light source in the upper part of the image?
To understand this somewhat counterintuitive geometry, it is important to reiterate that the geometric shadow analysis informs the projection of the three-dimensional light source in the two-dimensional image plane. This projection can be anywhere in the image.
To understand why, consider the diagram on the left in the figure above that depicts a camera pinhole (aperture) and camera sensor plane (the upper half of which is shaded red and the lower half of which is shaded blue). I have placed the camera pinhole behind the sensor so as to undo the image inversion that naturally occurs in all imaging systems. The red dot corresponds to the position of a 3D light source in front of the camera and the blue dot corresponds to the position of a 3D light source behind the camera. The dotted lines represent the projection of these light sources into the 2D image plane.
Notice that the light in front of the camera projects to the upper half of the image plane (red) while the light behind the camera projects to the lower half of the image plane (blue). In this example, I’ve positioned the lights so that they project into the image plane, but depending on their location, they may project anywhere in the infinite 2D image plane, including outside of the image boundary (as in the eagle video).
To the Editors:
I found Hany Farid’s article interesting, particularly because the last issue’s feature “Photoshopping the Universe” by Travis A. Rector, Kimberly Arcand, and Megan Watzke (January–February) showed how Photoshop is used to alter astronomy photos while specifically trying not to fake them.
Altering photos is now quite commonplace. Most of us want to correct a photo because it can be negatively affected by many factors. The lighting can cause a glare to come off most painted and sculptured surfaces. Colors vary with light or with the particular camera used and its color and exposure settings. Uneven light or the light of a flash can affect the exposure and colors. Even the colors outside the scene can influence the colors of a photo. There is usually a lens barrel distortion that may have to be corrected, but the barrel distortion may not be consistent on all sides of the photo, and one or more sides may develop a small fish-eye distortion. Shooting at an angle to avoid glare or because you cannot get into a position in front of the subject sometimes necessitates a perspective correction to square off the corners. But this correction doesn’t always place the center of a squared-off object at its true center, nor does it preserve its aspect ratio.
Lightening or darkening a photo is sometimes desired. But lightening a light area or darkening a dark area can destroy details in an image. So a brush tool would have to be used to treat small areas of the photo. Sharpening is useful at times, but it destroys the depth of a photo and usually introduces artifacts that will show in a print or enlargement. There are algorithms to remove artifacts caused by the camera’s creation and storing of the photo, but these can result in a blurring of the image. There are even tools to remove unwanted objects from a photo, filling in the void with what lies around the removed object. If there is a texture depicted in the photo, such as a grained paper or the weave of a fabric, removing objects can cause visible changes in that texture.
The camera, like the human eye, is fallible. In many ways a photograph is not about what we see but about what we want to see.
Ronald S. Csuha
New York, NY

American Scientist Comments and Discussion
To discuss our articles or comment on them, please share them and tag American Scientist on social media platforms. Here are links to our profiles on Twitter, Facebook, and LinkedIn.
If we re-share your post, we will moderate comments/discussion following our comments policy.