Giants in Traffic
By Fenella Saunders
A data visualization quantifies the stresses that boats put on blue whales.
A data visualization quantifies the stresses that boats put on blue whales.

Blue whales are always on the go. These marine giants feed mostly on tiny krill, consuming 2 to 8 tons a day. “They need areas where krill congregate, to find big swarms for it to be profitable to engage in a dive,” explains Rodrigo Hucke-Gaete, a marine biologist at Universidad Austral de Chile and Centro Ballena Azul, a nongovernmental organization. About 20 years ago, Hucke-Gaete and his colleagues identified a particular area of Northern Chilean Patagonia as a rich feeding area for blue whales, and they have been working to get protected status for the area ever since. But the same area is also attractive for aquaculture, not to mention boats for fishing, tourism, and transport. The region is thus pretty congested, and whales are competing for space in which to move around.
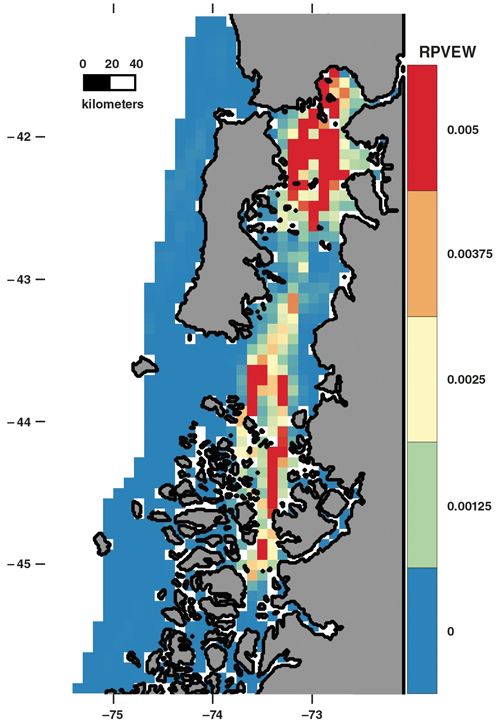
L Bedriñana-Romano, et al. Scientific Reports 11:2709.
In a February 1 paper in Scientific Reports, the team showcased a new analysis of the whales’ predicament. The researchers used their whale data obtained from tags and visual surveys, and combined it with marine data (such as sea surface temperature, thermal fronts, and chlorophyll levels) of conditions favorable to krill. They overlaid vessel location data, which Chile requires fisheries, aquaculture, and transport boats to provide. The resulting maps showed the relative probability of a vessel encountering a blue whale (RPVEW); the map below is specifically for aquaculture vessels, which make up 80 percent of the boat traffic in this area.
But in addition to the maps, team member Luis Bedriñana-Romano created a data visualization of the life of one whale during one week. (See video below.) The animation (which does not depict the boats or whale to scale) demonstrates how much time and energy a whale (blue dot with streak showing movement) must expend avoiding aquaculture vessels (red dots with streaks showing movement).
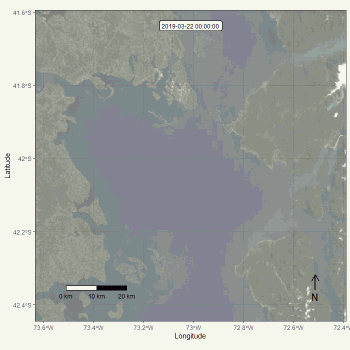
L Bedriñana-Romano, et al. Scientific Reports 11:2709 and Centro Ballena Azul, https://centroballenaazul.org/
“It’s not only about the possibility of ship strikes, but exposure to noise, and just annoyance to the whales,” says Bedriñana-Romano. “If whales need to spend a lot of time trying to feed to get the energy required for migration, and they have to waste energy dodging boats all day, even if the boats don’t strike the whales, that’s a huge deal for a population that is recovering.“
Hucke-Gaete explains that whales don’t simply dive to avoid boats because whales travel at the surface when moving between feeding areas, which is faster and uses less energy. Also, krill go to the surface at night, so at dawn and dusk the whales feed there. “When you see a blue whale feeding at the surface, it’s like someone who hasn’t eaten for a week,” he says. “You don’t care what’s happening around you when you’re a 30-meter animal feeding on very small crustaceans.”
The study has raised awareness about boat traffic and whales, says Bedriñana-Romano: “Chile has a lot of environmental issues, but traffic was not on the list so far, and in Chile there is no regulation on the speed of boats. It’s just the tip of the iceberg, but a concrete, specific thing that we can do now is requiring vessels navigating in a blue whale area to reduce speed.”
The animation caused a stir on social media about the whale’s apparent stress. “We’ve gotten a lot of sympathy for what was happening to that whale,” says Hucke-Gaete. “Science needs to flow and to cross blockages that scientists ourselves sometimes provoke by talking about complicated stuff, and this video had so much impact.”
The group next plans to incorporate more detailed data from international ships, satellites, and upgraded whale tags. The team is also looking to better quantify the migration routes and breeding grounds of the whales.
“It’s very important that we now have the ability to congregate this kind of data, because the application for conservation is huge,” says Bedriñana-Romano. “Data visualization is providing an aid that we didn’t have before. In terms of outreach or communicating something that is sensible for conservation, it’s the best, because it makes everything clear, you can reach everyone, and that’s cool.”
Click "American Scientist" to access home page

American Scientist Comments and Discussion
To discuss our articles or comment on them, please share them and tag American Scientist on social media platforms. Here are links to our profiles on Twitter, Facebook, and LinkedIn.
If we re-share your post, we will moderate comments/discussion following our comments policy.